Upload external code
If you want to use your own Python modules or scripts in Jupyter notebooks, follow these steps to upload them easily.
1. Prepare your external code
Organize your external code and follow Python packaging best practices. Set up the right folder structure, add an __init__.py file, and list any required dependencies.
Suggested Directory Structure:
src/
|-- PYTHON_PROJ_NAME/
|   |-- __init__.py
|   |-- my_script.py
|   |-- subpackage/
|       |-- __init__.py
What goes in __init__.py?
Think of __init__.py as the file that tells Python “this folder is a package”.
If you leave it empty, that is perfectly fine—the package will still import correctly. When you want to make notebooks feel friendlier, you can re-export helper functions so users can discover them more easily:
# src/PYTHON_PROJ_NAME/__init__.py
from .my_script import run_analysis, load_config

__all__ = ["run_analysis", "load_config"]
Each folder that you plan to import (for example, src/subpackage/) should also have its own __init__.py. Keep it empty unless you want to expose selected helpers from that subpackage.
If you need further readings on __init__.py, check out this quick Geeks for Geeks tutorial or the Real Python guide.
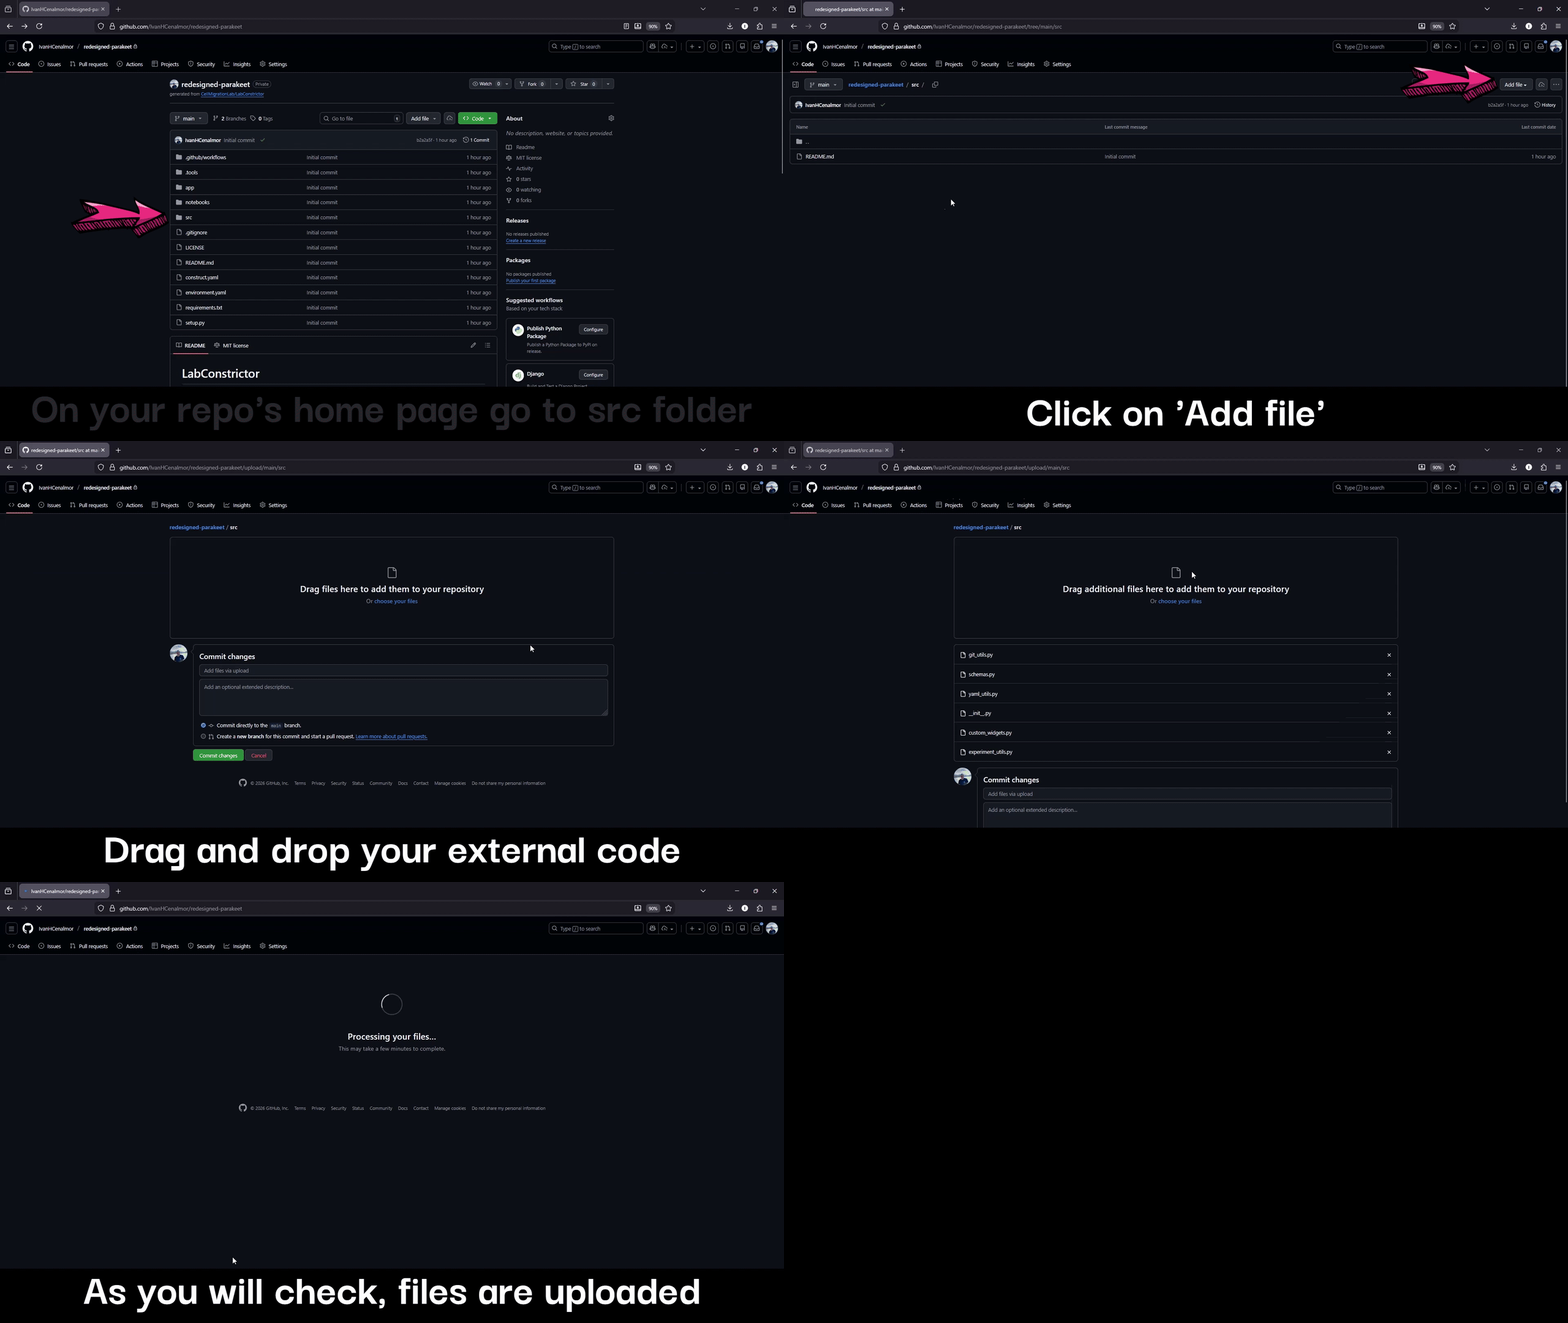
2. Upload your external code to the repository
Go to the src folder in your repository and upload your files or folders there.
3. How to import into your notebook
Once uploaded, your external code will be available to your notebooks as a package. To use it, import it as shown in the examples below:
Import the whole package:
import PYTHON_PROJ_NAME
If your folder under src/ is called celltools, then import celltools will work because src/celltools/__init__.py exists.
Import function:
from PYTHON_PROJ_NAME import my_script
Import submodule:
from PYTHON_PROJ_NAME.subpackage import submodule1
4. Publish the code on PyPI (optional)
The installer always puts your package into the app. You can also publish it on PyPI, so that anyone can install it with pip install, in Google Colab or in their own Python. Each release then does both, with the same version: the GitHub Actions workflow .github/workflows/publish_pypi.yml builds the package and uploads it when you publish a release, next to the installers.
It is off until you turn it on, and GitHub stores no password or token for it: PyPI trusts this repository's workflow directly (trusted publishing).
What is published
| Name | The name= of setup.py: the name of the package, given when the repository was initialised (unless you changed it). If labconstrictor-app.yaml has distribution.pip, it must be the same name. |
| Version | The release tag without the v: release v1.2.0 publishes 1.2.0. |
| Code | Every package in src/ (a folder with an __init__.py). |
| Dependencies | Each line of requirements.txt, as it is written (exact versions included). Options (-r, --extra-index-url), paths and URLs are left out, with a warning in the log: PyPI refuses dependencies given as URLs. |
| Description | README.md of the repository, shown on the PyPI page. |
| License | The LICENSE file. |
One-time setup
- Check that the name is free. Open
https://pypi.org/project/<name>/. A "404 Not Found" page means nobody uses it. If it is taken, changename=insetup.py(anddistribution.pip) and commit. - Register this workflow on PyPI. Log in to pypi.org (create an account if you have none; PyPI asks for two-factor authentication). Open your account menu > Your projects > Publishing (pypi.org/manage/account/publishing). Under Add a new pending publisher, choose the GitHub tab. The form has five fields; fill them in exactly:
- PyPI Project Name: the name of the package.
- Owner: the GitHub user or organisation that owns the repository (
CellMigrationLabingithub.com/CellMigrationLab/MyApp). - Repository name: the repository (MyApp). - Workflow name:publish_pypi.yml- Environment name:pypi
Click Add. The publisher appears under Pending publishers below the form. It does not reserve the name: the project is created by your first release. If the project already exists on PyPI and you own it, add the publisher in the project instead: Your projects > the project > Manage > Publishing.
3. Turn it on in GitHub. In the repository, open Settings > Secrets and variables > Actions, then the Variables tab (not Secrets: a secret cannot turn a workflow on). Click New repository variable, type PYPI_PUBLISH as the name and true as the value, and click Add variable.
4. Publish a release as usual (Create executable installers). In the Actions tab, the workflow Publish the Python package to PyPI runs next to Build Release Installers. When both jobs are green, the package is at https://pypi.org/project/<name>/. The upload job shows the link too.
Try it on TestPyPI first (optional)
TestPyPI is a separate copy of PyPI for trials, with its own account. Add the same pending publisher at test.pypi.org/manage/account/publishing, give the variable PYPI_PUBLISH the value testpypi, and publish a release. Install the result with:
pip install --index-url https://test.pypi.org/simple/ --extra-index-url https://pypi.org/simple/ <name>
Then change the variable to true: the next release goes to PyPI.
Turn it off
Delete the variable PYPI_PUBLISH (Settings > Secrets and variables > Actions > Variables). The workflow stays in the repository and is skipped at each release (a grey icon in the Actions tab, not a failure). What was published stays on PyPI.
Good to know
- A version can be uploaded only once, even after it was deleted from PyPI. The workflow checks this before it builds anything and stops with a clear message; to publish a fix, make a new release with a higher version.
- The release writes its version into
setup.py(the "Update version" commit of the release workflow), so the file and PyPI agree. - To approve each upload by hand, open Settings > Environments > pypi (GitHub creates it at the first run) and add Required reviewers.
- A repository that already publishes to PyPI with a workflow of its own does not get
publish_pypi.ymlfrom the template update, so nothing is uploaded twice. See the design note of template 0.1.25. - If the workflow fails, see Troubleshooting.