Write notebooks that run in both Google Colab and JupyterLab
LabConstrictor ships notebooks as desktop apps built on JupyterLab. At the same time, many collaborators and reviewers prefer Google Colab for quick, cloud-based runs. Writing your notebook to work in both environments makes it easier for users to:
- Choose their preferred platform (Colab in the browser, JupyterLab locally or inside LabConstrictor).
- Collaborate and review quickly without forcing everyone to install dependencies.
- Reproduce results across cloud and local setups, reducing “works on my machine” issues.
- Avoid hidden environment assumptions that only exist in one runtime.
Below are practical patterns to keep notebooks portable and readable across both runtimes.
1. Keep explanatory text visible when code is hidden
LabConstrictor apps often hide code cells to present an app-like UI (see Hide code cells in notebooks).
If you place # @title at the top of the cell in Colab, it would give a header to the code cell on Google Colab while remaining visible in local JupyterLab sessions. Follow the example below to keep your notebook clear and user-friendly in both environments:
# @title Data input

# Rest of the cell...
Note: If you need an explanation longer than a line, please use a Markdown cell with the explanation. This way, the text is visible everywhere, regardless of code visibility.
2. Guard Colab-only setup code
Colab-specific setup (mounting Google Drive, installing GPU-only deps, !pip installs) should run only on Colab. To avoid failures when running locally, wrap it like this:
import sys

if 'google.colab' in sys.modules:
    print("🚀 Detected Google Colab. Starting installation...")

    !pip install -q "cellpose[all]" tifffile
    !pip install -q instanseg-torch

    from google.colab import userdata
    from google.colab import drive

    drive.mount('/content/gdrive')

    print("✅ Colab setup done")
else:
    # Fallback for local environments
    print("⚠️ Not running in Colab. Please ensure dependencies are installed and data paths are set.")
3. Prefer cross-platform paths and storage
- Use
pathlib.Pathand relative paths when possible. - Avoid hard-coding Colab paths like
/contentor/content/gdriveoutside guarded blocks. - For data files, include a config cell where users can set a local path or select a file.
4. Avoid Colab-only UI helpers
Avoid using Colab forms (see Google's guide to Colab forms) as they won’t work in JupyterLab. Instead, we recommend using ipywidgets or simple input prompts that work in both environments. This ensures your notebook remains interactive and user-friendly regardless of where it’s run.
For example, you could turn this Colab form:
model_name = "Model A"  # @param ["Model A", "Model B", "Model C"]
print(f"You selected: {model_name}")

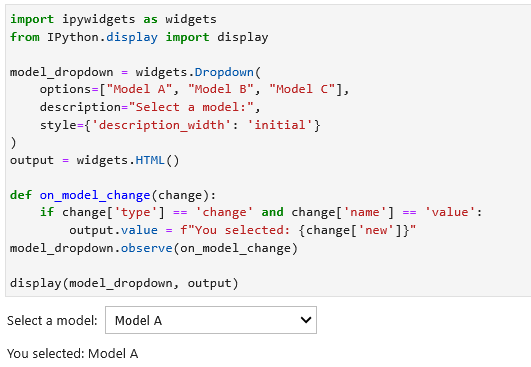
Into, for example an ipywidgets dropdown that works in both environments:
Option A - with an observable function:
import ipywidgets as widgets
from IPython.display import display

model_dropdown = widgets.Dropdown(
    options=["Model A", "Model B", "Model C"],
    description="Select a model:",
    style={'description_width': 'initial'}
)
output = widgets.HTML()

def on_model_change(change):
    if change['type'] == 'change' and change['name'] == 'value':
        output.value = f"You selected: {change['new']}"
model_dropdown.observe(on_model_change)

display(model_dropdown, output)
Option B - With a button to confirm the selection:
import ipywidgets as widgets
from IPython.display import display

model_dropdown = widgets.Dropdown(
    options=["Model A", "Model B", "Model C"],
    description="Select a model:",
    style={'description_width': 'initial'}
)
confirm_button = widgets.Button(description="Confirm Selection")
output = widgets.HTML()

def on_confirm_button_click(b):
    output.value = f"You selected: {model_dropdown.value}"
confirm_button.on_click(on_confirm_button_click)

display(model_dropdown, confirm_button, output)
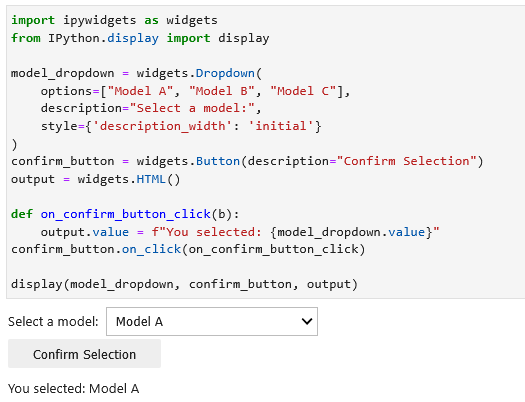
As you can see the ipywidgets options require a bit more code, but they work in both environments and are much more versatile in functionality and visualization.
5. Clearly label runtime-specific instructions
To reduce confusion and keep the flow smooth in both environments, add small callouts in Markdown to guide the user, for example:
Colab users: Run the
Colab setupcell first to mount Google Drive.JupyterLab users: Skip the
Colab setupcell and configure the local data path instead.
6. Test in both environments before release
Testing both environments before making it public ensures a smooth experience for all users:
- Run the notebook end-to-end in JupyterLab (or local Jupyter) to validate the LabConstrictor experience.
- Run the same notebook in Google Colab to confirm cloud compatibility.